THE MALACHITE CHEST
, by Amy Howard, 9 min reading time
, by Amy Howard, 9 min reading time
Perusing Craigslist, I was inundated with wide mahogany chests, resting on dumpy bun feet and pairs of chintzy nightstands boasting assembly line made shutter doors. The worst pieces are redeemable with some elbow grease and a good design plan, but I was looking for something inspiring, something with real potential for fabulous.
Perusing Craigslist, I was inundated with wide mahogany chests, resting on dumpy bun feet and pairs of chintzy nightstands boasting assembly line made shutter doors. The worst pieces are redeemable with some elbow grease and a good design plan, but I was looking for something inspiring, something with real potential for fabulous. Ready to abandon the craigslist search and move to a nearby thrift store, I made a last ditch effort and scrolled to the fifth page of my “dresser,” search. My eyes swiftly moved about the screen and landed upon a piece that made my heart leap and my fingers still. It was a simple chest. I immediately recognized it as mid- century. The lines were angular and well proportioned; the hardware was slightly oversized in a really intentional and sort of glamorous way. The finish was a dated golden oak, but that was obviously an easy fix. THIS was the piece I had been searching for! THIS was the the gem amongst the quarry of squatty end tables and arm chairs. I haggled the seller a bit, and won my prize for a mere $35! My wheels were turning, inspiration abound! I could not wait to have my treasure in the studio, open its’ drawers and let it tell me of its’ past, as I sweetly unfurled its’ future.
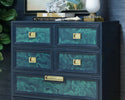
Upon it’s arrival, I ran my hands over the tarnished hardware and felt the heft of the solid brass. I traced the lines of the facade and pulled open the top drawer to find a maker's mark, “drexel,” (a powerhouse of high-quality, high-style, mid-century furniture) stamped inside. It was even better in person. I knew we had to maintain the integrity of this piece; we needed to respect its’ heritage while infusing a sense of “nowness.” I reflected on some of the colors, surfaces and patterns from design of the 60’s and 70’s. I remembered an image of Tony Duquette's California residence I had recently stumbled upon during a Pinterest binge. I thought of the candy-like surface of the swirling emerald walls, the lush velvet upholstery, the wiley verdant branches of potted house plants, and the warm golden reflection of light on unlacquered brass. I wanted this dresser to look like Mr. Duquette had personally owned and selected this dresser to reside in the midst of his luxe and eclectic collection. It needed to be malachite.
So I set about pulling colors and sketching out a plan for their placement. I flipped through images of malachite and saw that the shades of green varied from bright lime, to rich emerald, to oceanic teal, all traced with black veins. I started with a pretty literal translation of nature’s malachite, pairing a true green with black. I thought initially, that I might cover the entire surface of the chest in the malachite pattern, but the inset bevel of the drawer face posed a problem and I was afraid that inherent detail, may be lost in an overall application. Containing the pattern within the bevel seemed like a better idea and reminded me of the the gleaming jewel like effect of an enamel bracelet. I sketched out the dresser again, painting the body black and the drawers malachite, but the black felt so harsh and maybe a little less contemporary that I had hoped. I wanted the drama of a dark hue but wanted to just soften the slightly garish quality black was emanating. Navy seemed like a great solution. I pulled “Lady Singing the Blues,” one step paint, and poured a little black into the pot. It rendered a lovely, deep, dark navy that felt just a bit more custom than black. The green to coordinate, would need to be a true green, with a hint more blue than yellow. I stirred together spoonfuls of “Easy Street,” “Dunavant Green,” and “Get in Gear,” eventually arriving upon the exact right hue. It mocked up beautifully, in my sketchbook and the test run on my practice drawer was gorgeous. I could now readily transform my piece into the jewel I had foreseen it to be.
I stepped away from my work and took in all its fabulous glory. It looked like it had been lifted out of a high-end design catalogue, something a big name designer might have paid hundreds, if not thousands, of dollars for. It was rich in color, texture and detail. With its heavy brass hardware freshly polished and the veins of the malachite running like meandering streams about, it had become a very visually interesting and custom statement piece. It would be the jewel of any space it might make home.

1 | PREP THE CHEST
Remove hardware, and clean chest with Amy Howard at Home ® Clean Slate™ using a Lint-free T-Shirt Rag. Remove drawers.
2 | PAINT THE BASE COLORS AND SEAL

*We made custom colors to suit our need by mixing One Step colors, but you could easily use any colors straight from the can, just be sure to use a light base color with a darker glazing color to achieve the best results for the malachite technique..
Mix Amy Howard at Home ® One Step Paint™ Lady Singing the Blues and Black at a 4:1 ratio. *You will want to mix enough of this color to paint the chest as well as the Malachite glazing technique. Paint or spray (with AHAH Hand Held Sprayer) entire chest with two thin coats, allowing 30-45 minutes drying time between coats. Allow to dry 2 hours.
Mix One Step Paint™ in Easy Street, Get in Gear, and Dunavant Green at a 2:2:1 ratio. Paint inset drawer panels with this custom color with two thin coats, allowing 25-30 minutes drying time between coats. Allow to dry 30-45 minutes.
Spray entire chest and drawer fronts with two coats of Amy Howard at Home ® Bright Idea™, allowing to dry 15 minutes between coats. Allow to dry 30 minutes after second coat. Not only will this give the chest a great sheen, it will create the ideal surface for the Malachite glazing technique.

3 | CREATE YOUR MALACHITE TOOL


Using Craft Knife make cuts into the corner edge of your Eraser at a slight angle, and going about ¼” deep (see photo). Go back and cut again at the opposite angle, allowing some cuts to cause bits of the eraser to fall away, creating an irregular comb edge as shown. Cut several tool edges (long sides as well as short sides) on several erasers for variety and a natural, irregular finished look.
4 | MIX GLAZE


Mix equal parts Amy Howard at Home ® Glazed Over™, navy blue mix from Step 2, and water.
5 | MALACHITE GLAZE TECHNIQUE
Using an Amy Howard at Home ® Soft Sable Brush, apply glaze mix over green inset panel of a drawer. Move immediately to next step, not allowing any drying time. You will have 10-25 minutes of “open time” (while the paint is still wet, fluid, and movable), so you will work on one drawer at a time.

Holding your eraser tool firmly between thumb and ring finger or middle finger, and applying pressure to center with index finger (see photo), place cut edge of the eraser tool firmly against an edge of the inset panel and begin pulling across the panel in an organic, random rounded zig-zag motion, with hesitation creating subtle points as opposed to being simply wavy (see photo), working toward one of the other edges of the panel. Wipe your eraser tool off between each pull.

Using a different side of your eraser tool for variety, fill in spaces within the panel, being sure to start and stop your patterns at an edge of the panel or against another pattern line (see photo), and moving in circular patterns, mimicking natural malachite. Take care to make sure every shape is different and random, and alternate eraser tool edges often.

Repeat Steps 7-9 on each drawer panel. Once your desired patterning is complete on each drawer, allow the glaze to dry for 30-45 minutes.
6 | MIX FINISHING GLAZE
Make a diluted glaze by mixing equal parts glaze mix from Step 6 and water.
Using Soft Sable Brush, apply diluted glaze mix over the entire panel. Move immediately to next step, not allowing any drying time.
Using a Lint-free T-Shirt Rag begin dabbing glaze, picking it up onto your rag, removing it to reveal the desired amount of malachite design. This will tone down the green background and soften the overall design. Continue this until you are satisfied with the look. If you remove too much glaze, simply apply more and repeat the process. Allow to dry 30-45 minutes.

Using Bright Idea, spray each panel to seal.

7 | FINISH
Soak hardware in lacquer thinner or Xyxlene, and scrub with steel wool to clean. Allow to dry completely.

Re-apply hardware to the chest.

Enjoy the Bragging Rights! ™