How to Gild Your Hardware
, by Gene Howard, 3 min reading time
, by Gene Howard, 3 min reading time
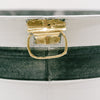
Gilding is an easy, quick way to give new life to your hardware, whether it’s on a dresser, cabinets, or a decorative piece with knobs or knockers. To make sure you apply the gilding properly and seal it for use, we at Amy Howard at Home are sharing a quick and easy gilded hardware tutorial.
1. Clean your surface with Amy Howard at Home® Clean Slate™.

2. With a clean artist’s brush, apply an even layer of the Amy Howard at Home® Gilding Size to the handles and hardware. Allow the Size to dry for 15 minutes until it comes to tack. This will feel slightly sticky but not wet.


3. Wrap your Amy Howard at Home® Gold Leaf around the gilding size layer, keeping the tissue paper between your hands and the leaf (if the Gold Leaf is touched before application, there is a chance it may not stick due to the oils on your fingers). Firmly press the Gold Leaf onto the handles and hardware, being mindful to cover the area completely. Apply three firm swipes of pressure across the gold leaf and then peel off the tissue paper.


4. Using a chip brush, dust off the leftover Gold Leaf pieces, using enough pressure to get off any excessive flakes.

5. Repeat the gilding application steps (Steps 2-4) until all of your hardware is covered.

6. Optional: apply a light layer of Light Antiquing Wax with a dry, clean chip brush, making sure to offload excess on a cardboard or paper strip before application. The wax will protect your piece if you plan to use the hardware a lot, as well as give it a beautiful sheen.
From there, set your hardware aside to fully dry and then, after a few hours, you can reattach it to your furniture or cabinetry. Then you’re ready to use your newly gilded hardware!
Ready to show off your DIY gilded hardware? Share a picture of your finished piece on Facebook and don’t forget to tag Amy Howard At Home so that we can see it. Share your project on Instagram with #amyhowardathome and tag @amyhowardhome on Instagram for a chance to be featured.


